> ## Documentation Index
> Fetch the complete documentation index at: https://docs.miraiminds.co/llms.txt
> Use this file to discover all available pages before exploring further.
# Campaign Management
> Learn how to create and manage voice campaigns with CSV data or API integration
## Overview
Voice campaigns allow you to automate outbound calls to multiple contacts. You can create campaigns using CSV data uploads or connect directly through your existing systems via API integration.
Upload contact lists using our CSV template for quick campaign setup and
data management.
Connect your existing systems via webhook to automatically sync contact
data.
Configure precise timing, timezone handling, and operating hours for optimal
contact rates.
Set retry logic, call duration limits, and inactivity periods to maximize
efficiency.
## Setup Guide
### Step 1: Access Campaign Creation
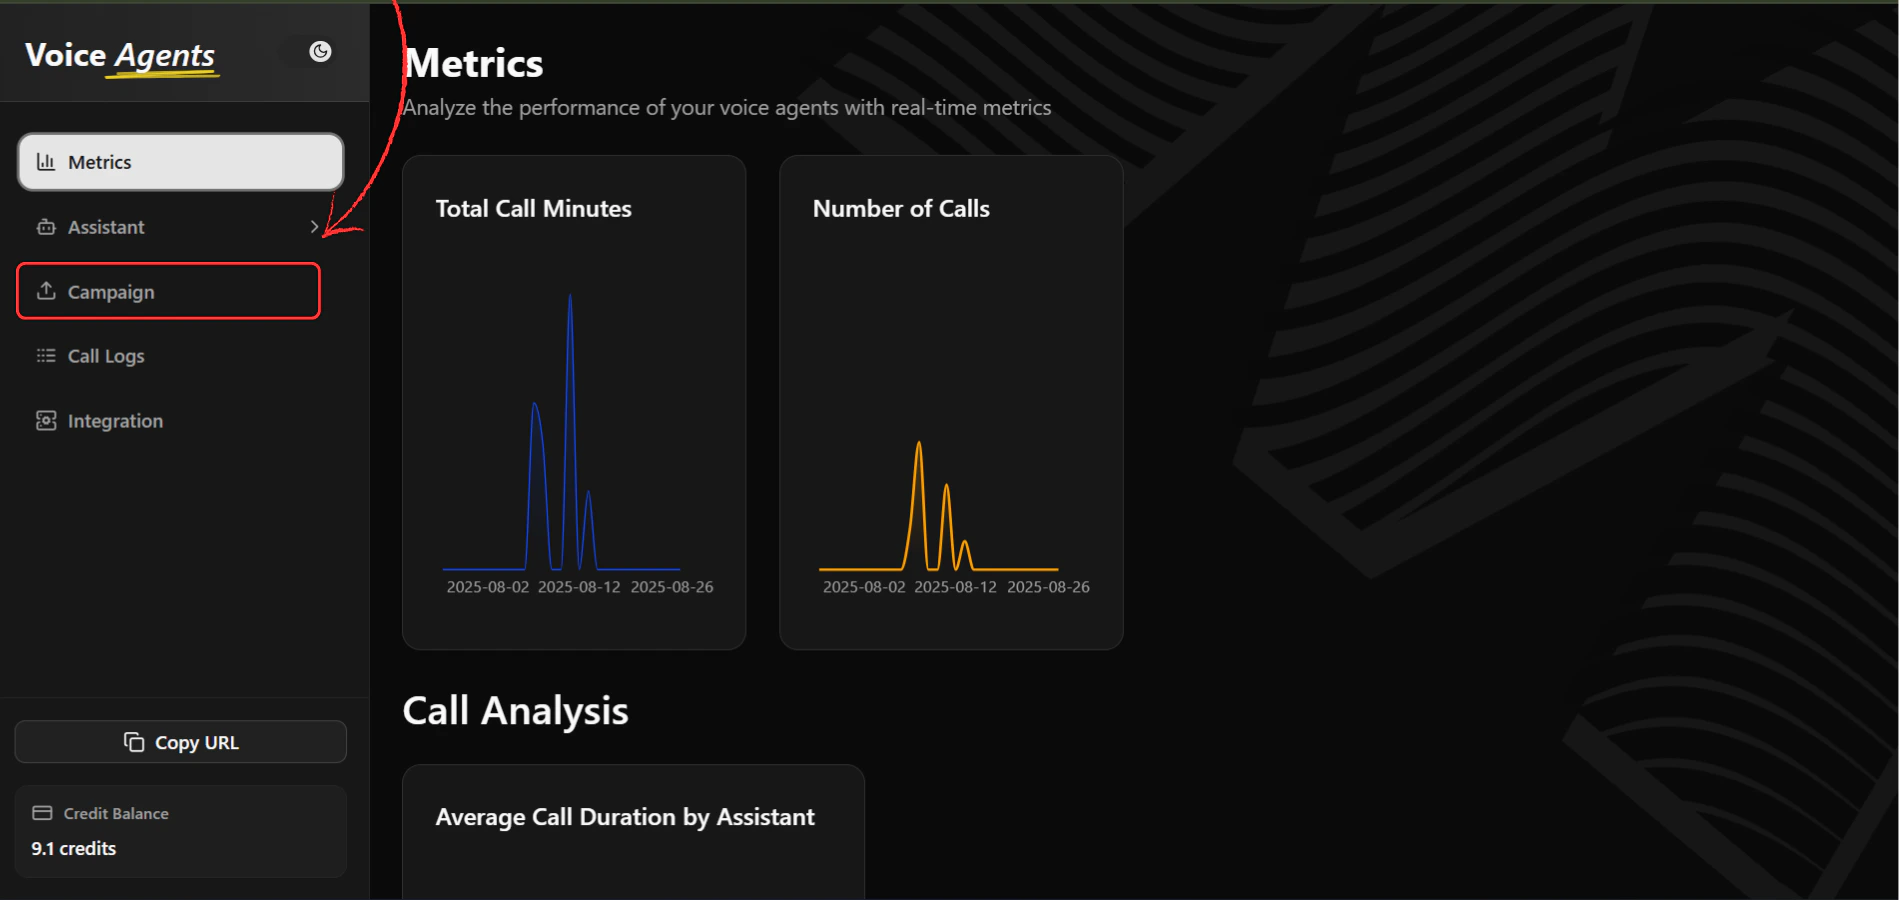
1. **Navigate to Campaigns Page**
Go to the **Campaigns** section in your Voice Agents dashboard.
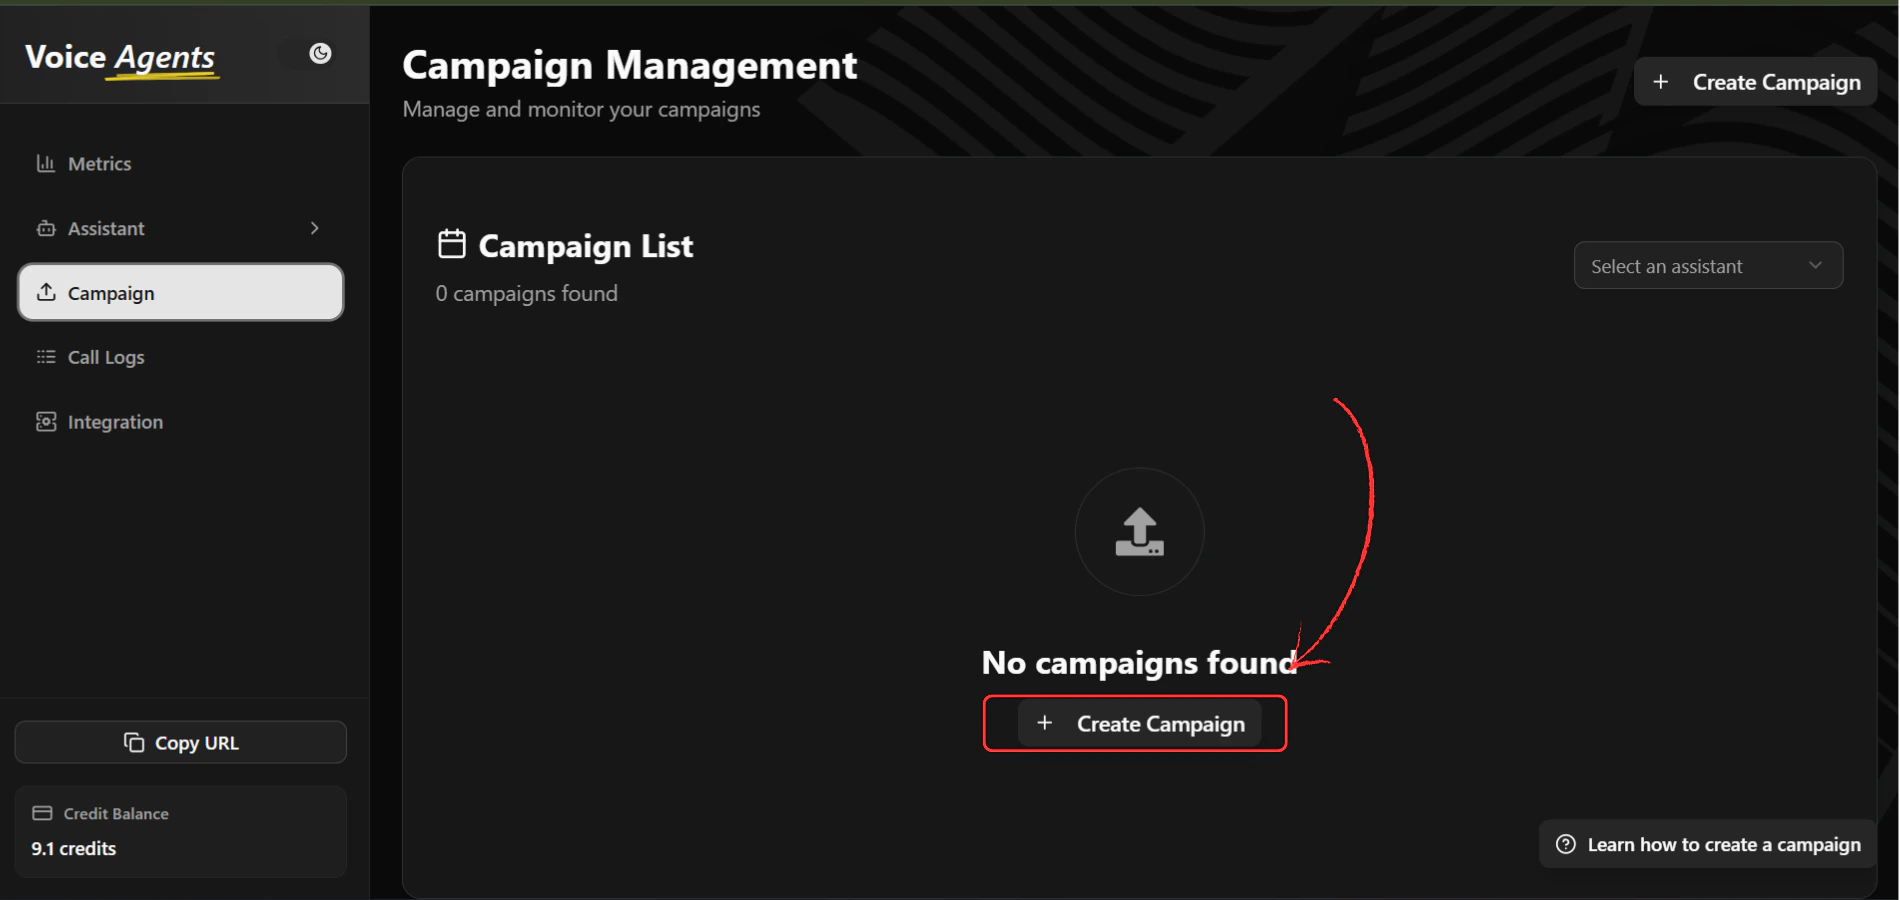
 2. **Create New Campaign**
Click the **"Create Campaign"** button to start the setup process.
2. **Create New Campaign**
Click the **"Create Campaign"** button to start the setup process.
 ### Step 2: Basic Campaign Configuration
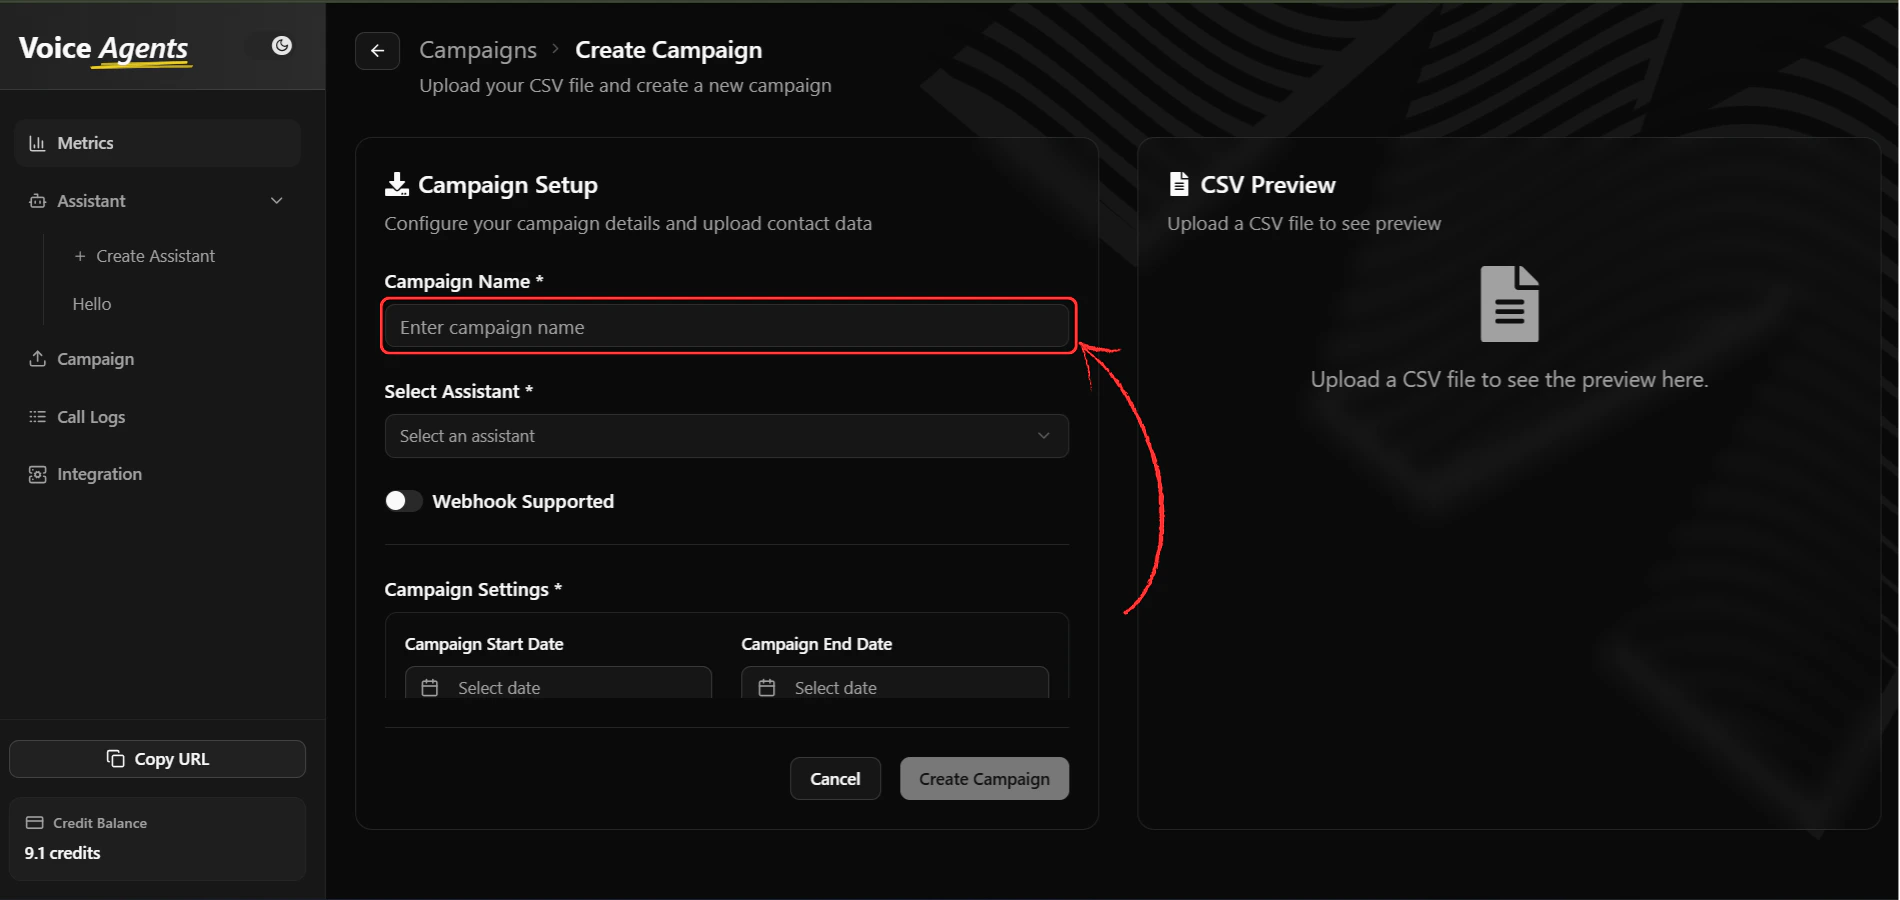
3. **Enter Campaign Name**
Provide a descriptive name for your campaign that clearly identifies its purpose.
### Step 2: Basic Campaign Configuration
3. **Enter Campaign Name**
Provide a descriptive name for your campaign that clearly identifies its purpose.
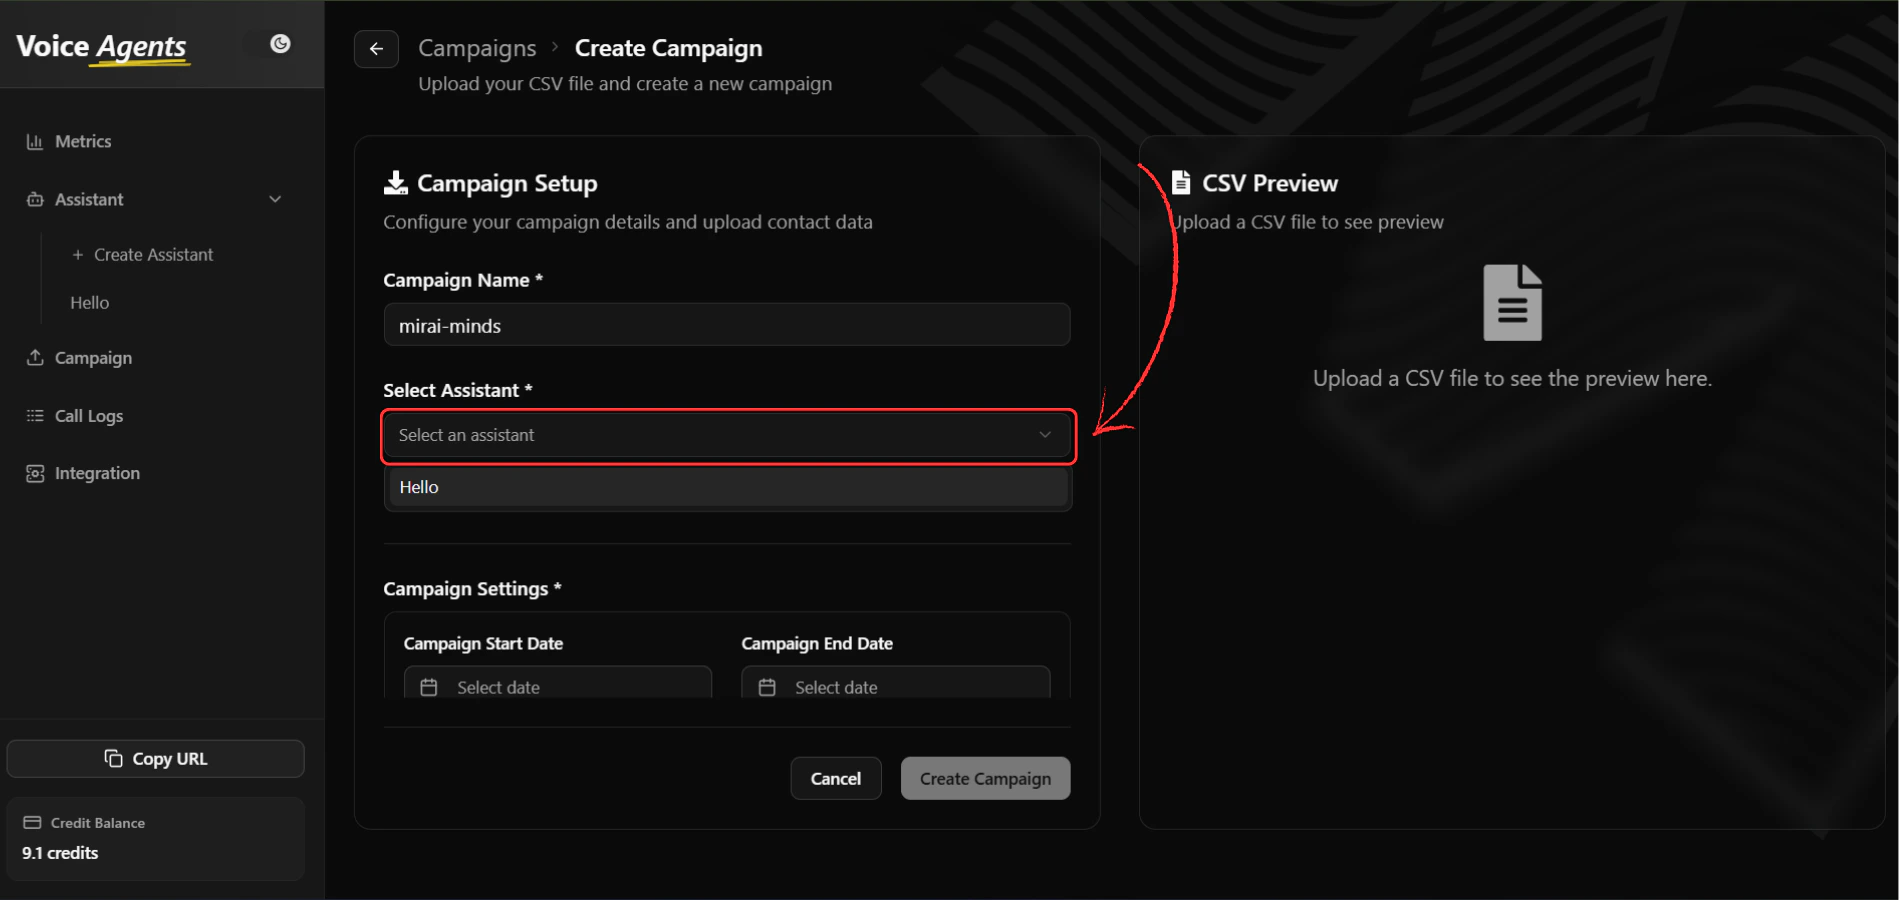
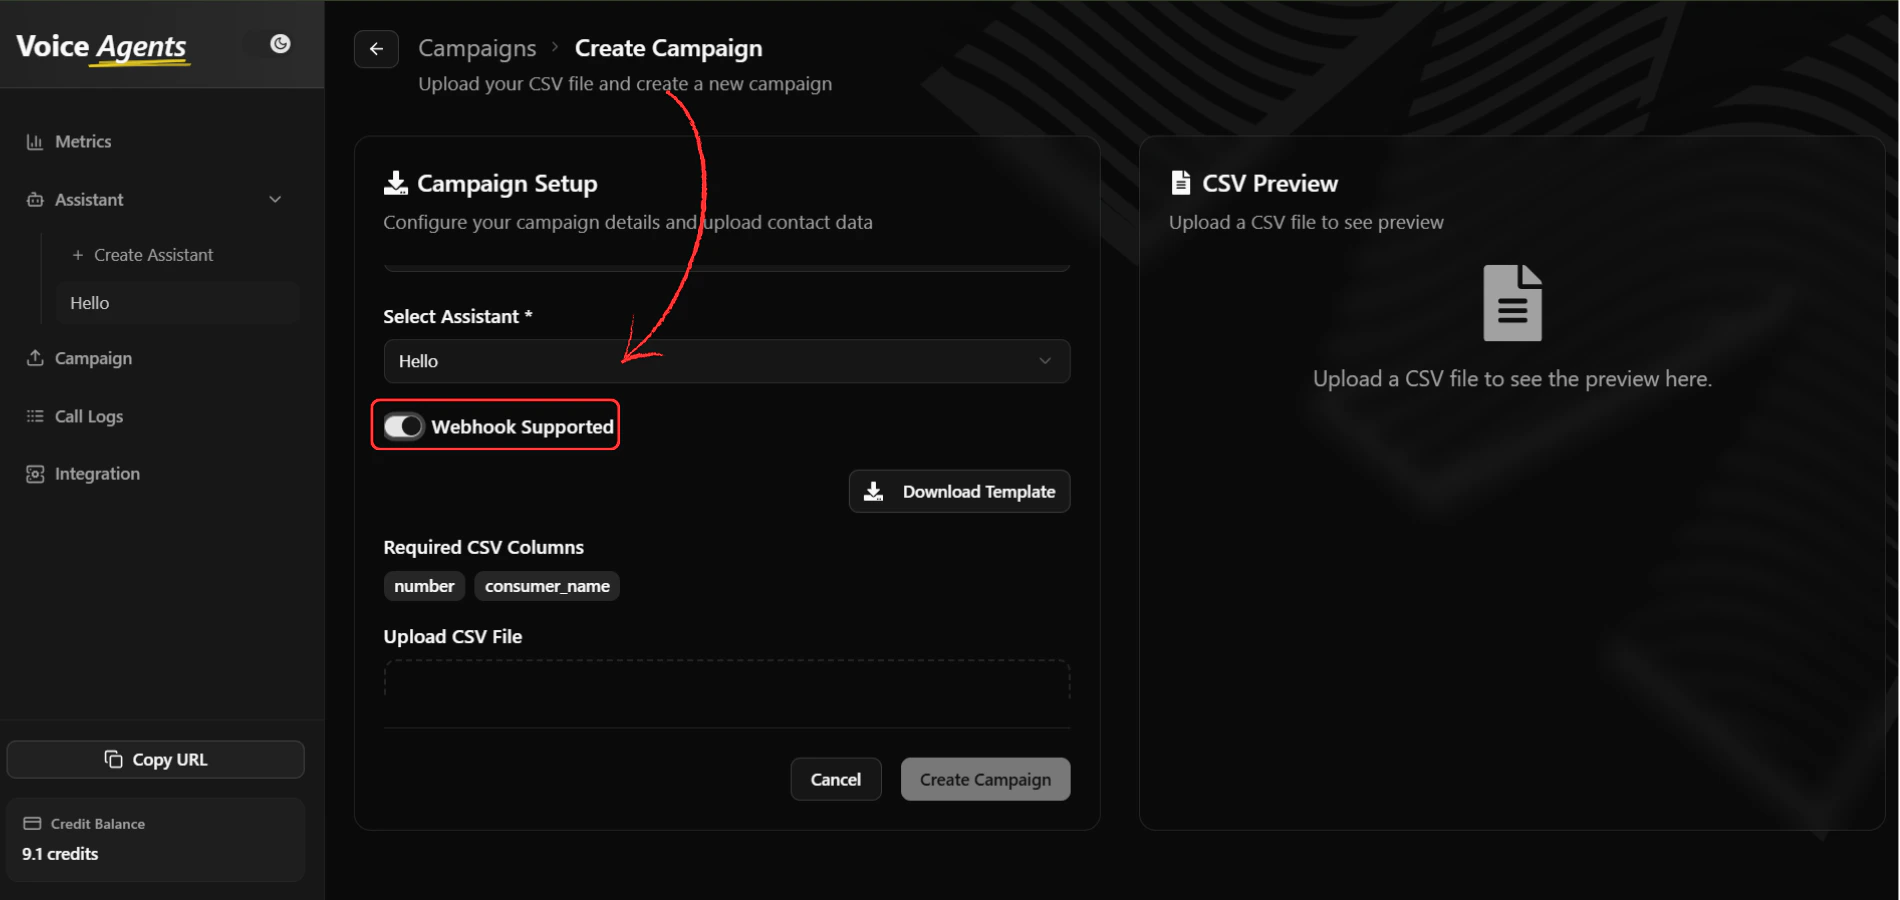
 4. **Select Voice Assistant**
Choose the voice assistant that will handle all calls for this campaign.
4. **Select Voice Assistant**
Choose the voice assistant that will handle all calls for this campaign.
 5. **Configure Webhook Integration**
Enable webhook integration if you need to add data from your platform through API. When enabled, CSV upload becomes optional.
5. **Configure Webhook Integration**
Enable webhook integration if you need to add data from your platform through API. When enabled, CSV upload becomes optional.
 ### Step 3: Data Management Setup
#### Option A: CSV Data Upload
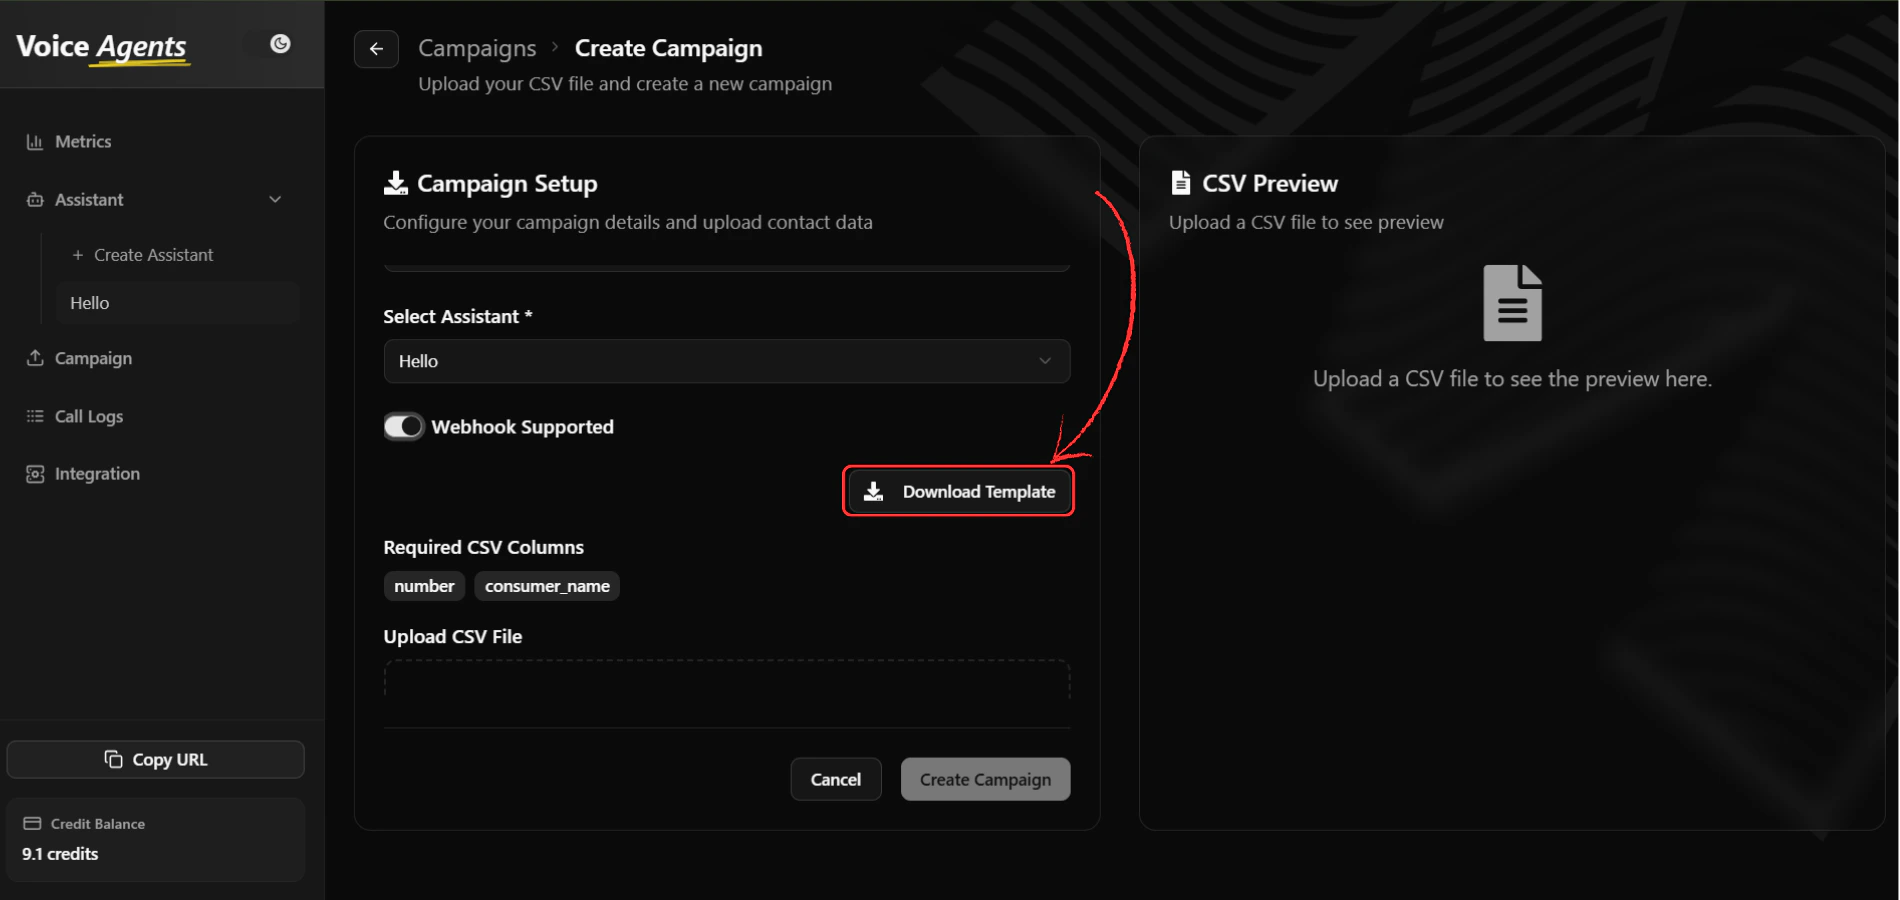
6. **Download CSV Template**
Click **"Download CSV Template"** to get the correct format for your contact data.
### Step 3: Data Management Setup
#### Option A: CSV Data Upload
6. **Download CSV Template**
Click **"Download CSV Template"** to get the correct format for your contact data.
 7. **Prepare Your Contact Data**
Update the downloaded CSV template with your contact information, ensuring all required fields are completed.
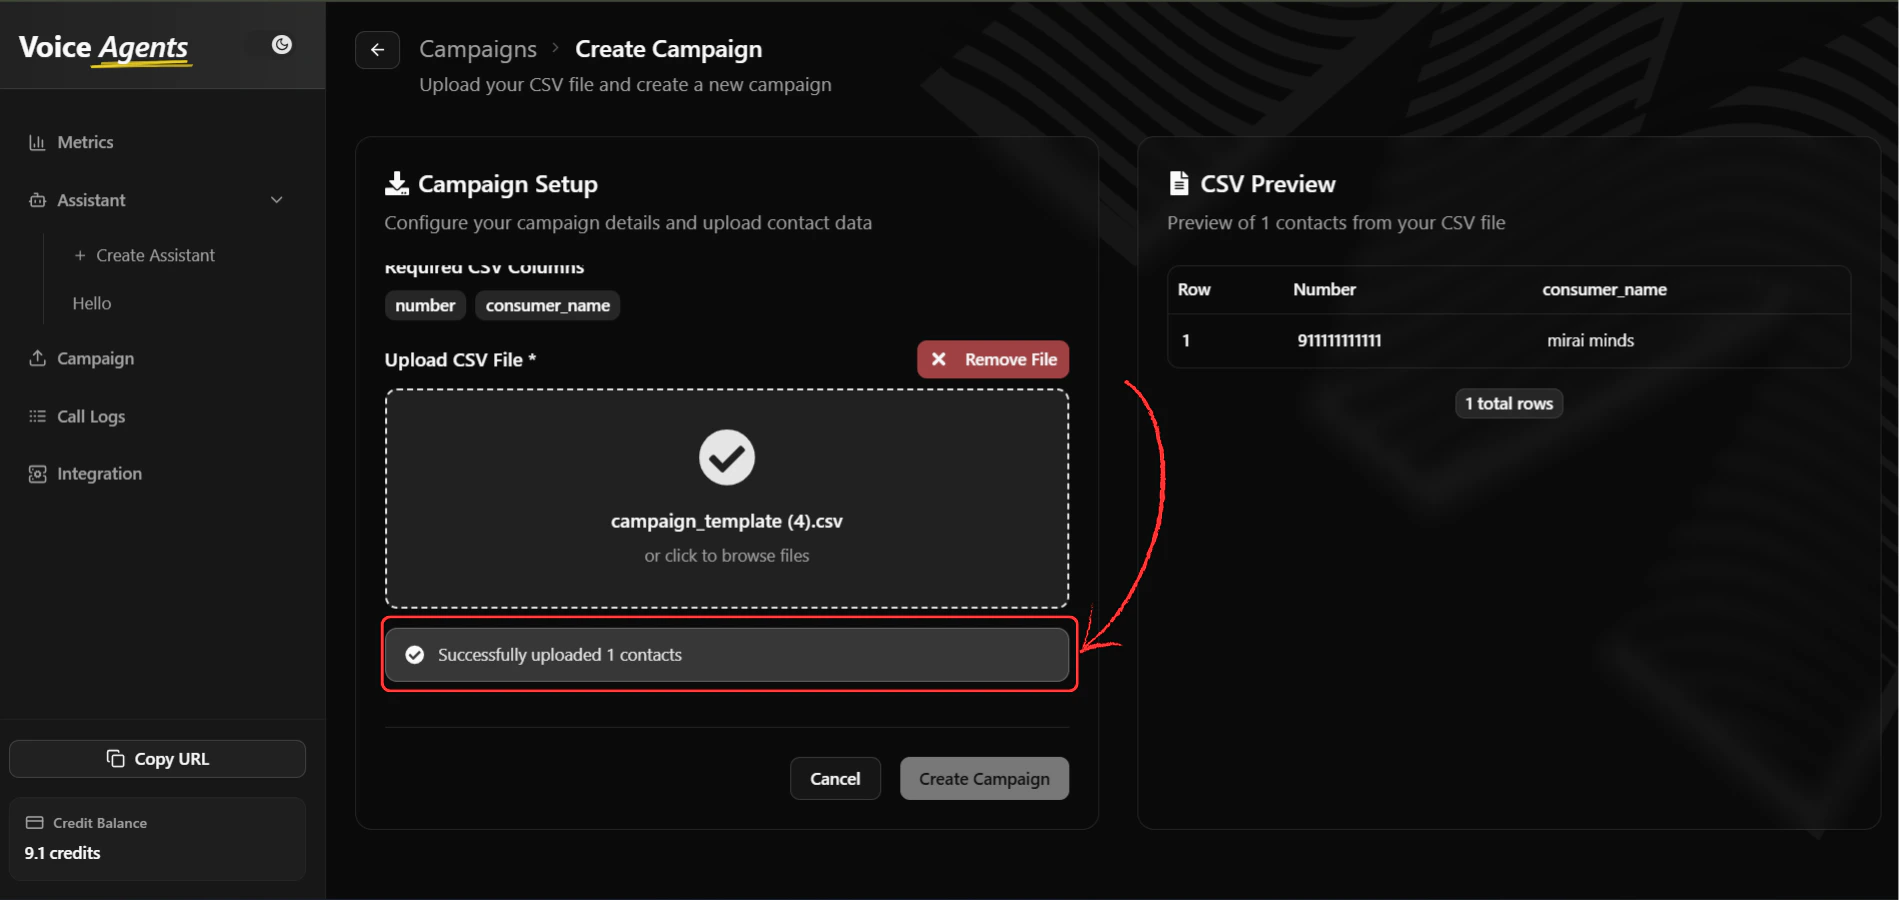
8. **Upload CSV File**
Upload your completed CSV file using the file upload interface.
7. **Prepare Your Contact Data**
Update the downloaded CSV template with your contact information, ensuring all required fields are completed.
8. **Upload CSV File**
Upload your completed CSV file using the file upload interface.
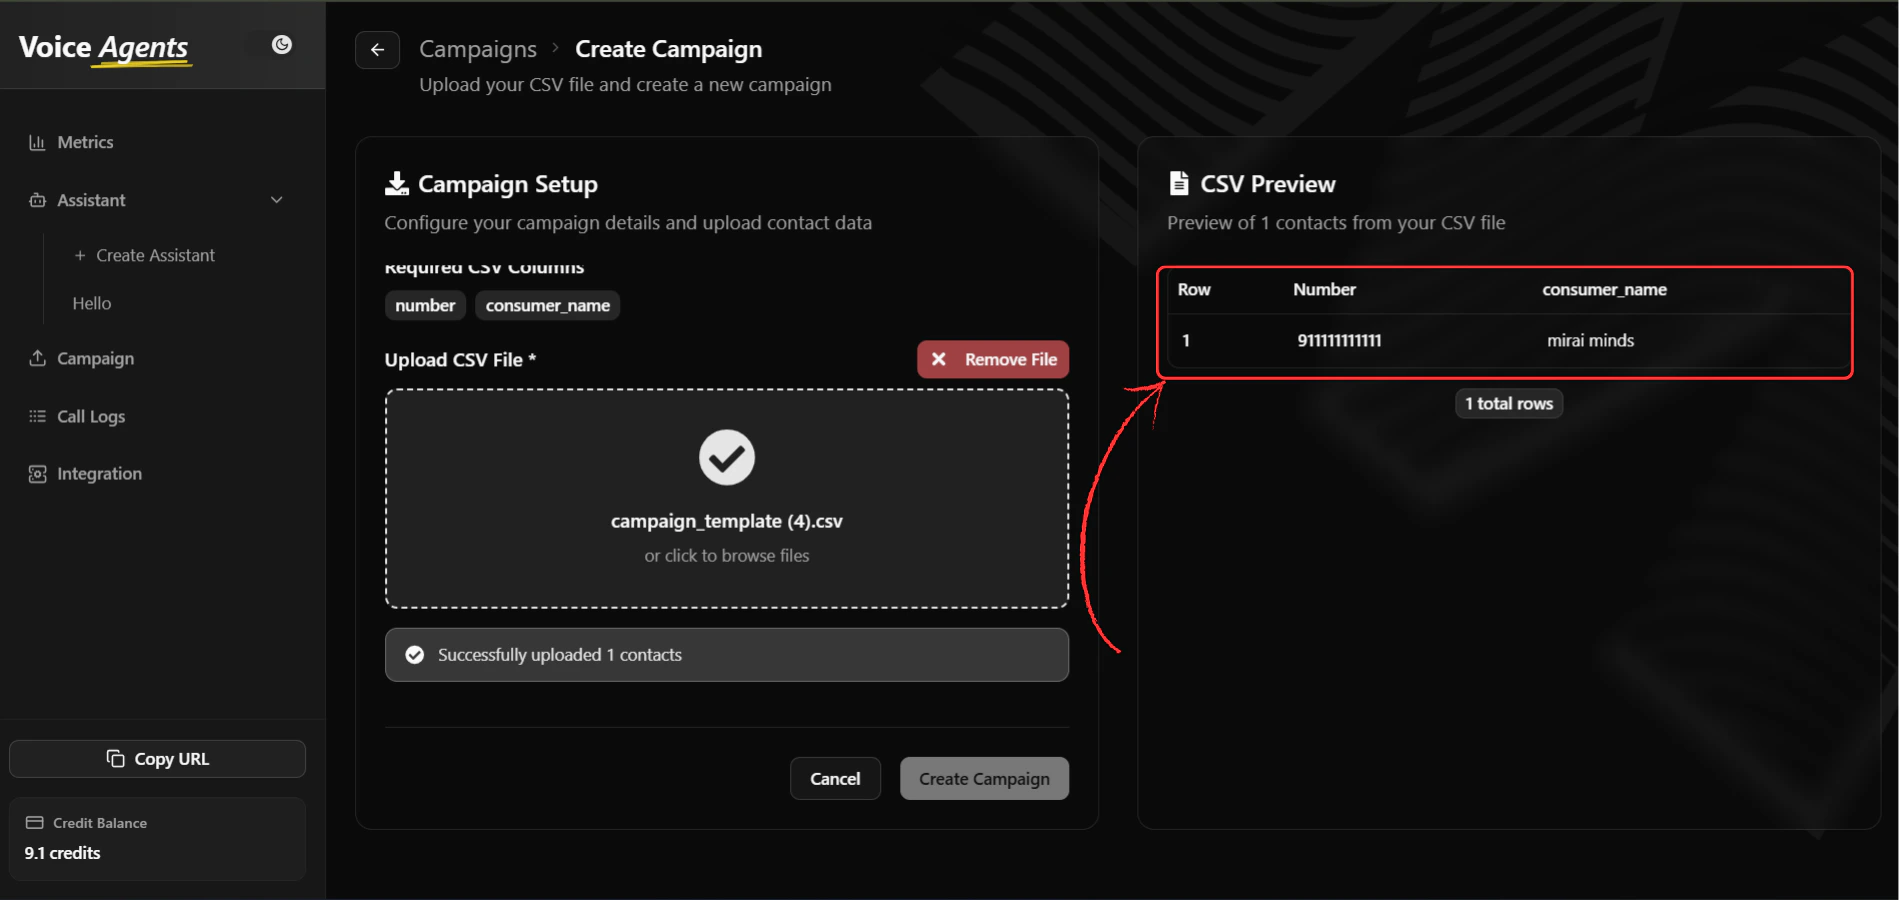
 9. **Preview Contact Data**
Review your uploaded data in the right panel preview to verify accuracy before proceeding.
9. **Preview Contact Data**
Review your uploaded data in the right panel preview to verify accuracy before proceeding.
 #### Option B: API Integration
When webhook is enabled, your platform can send contact data directly through API calls, eliminating the need for manual CSV uploads.
### Step 4: Schedule Configuration
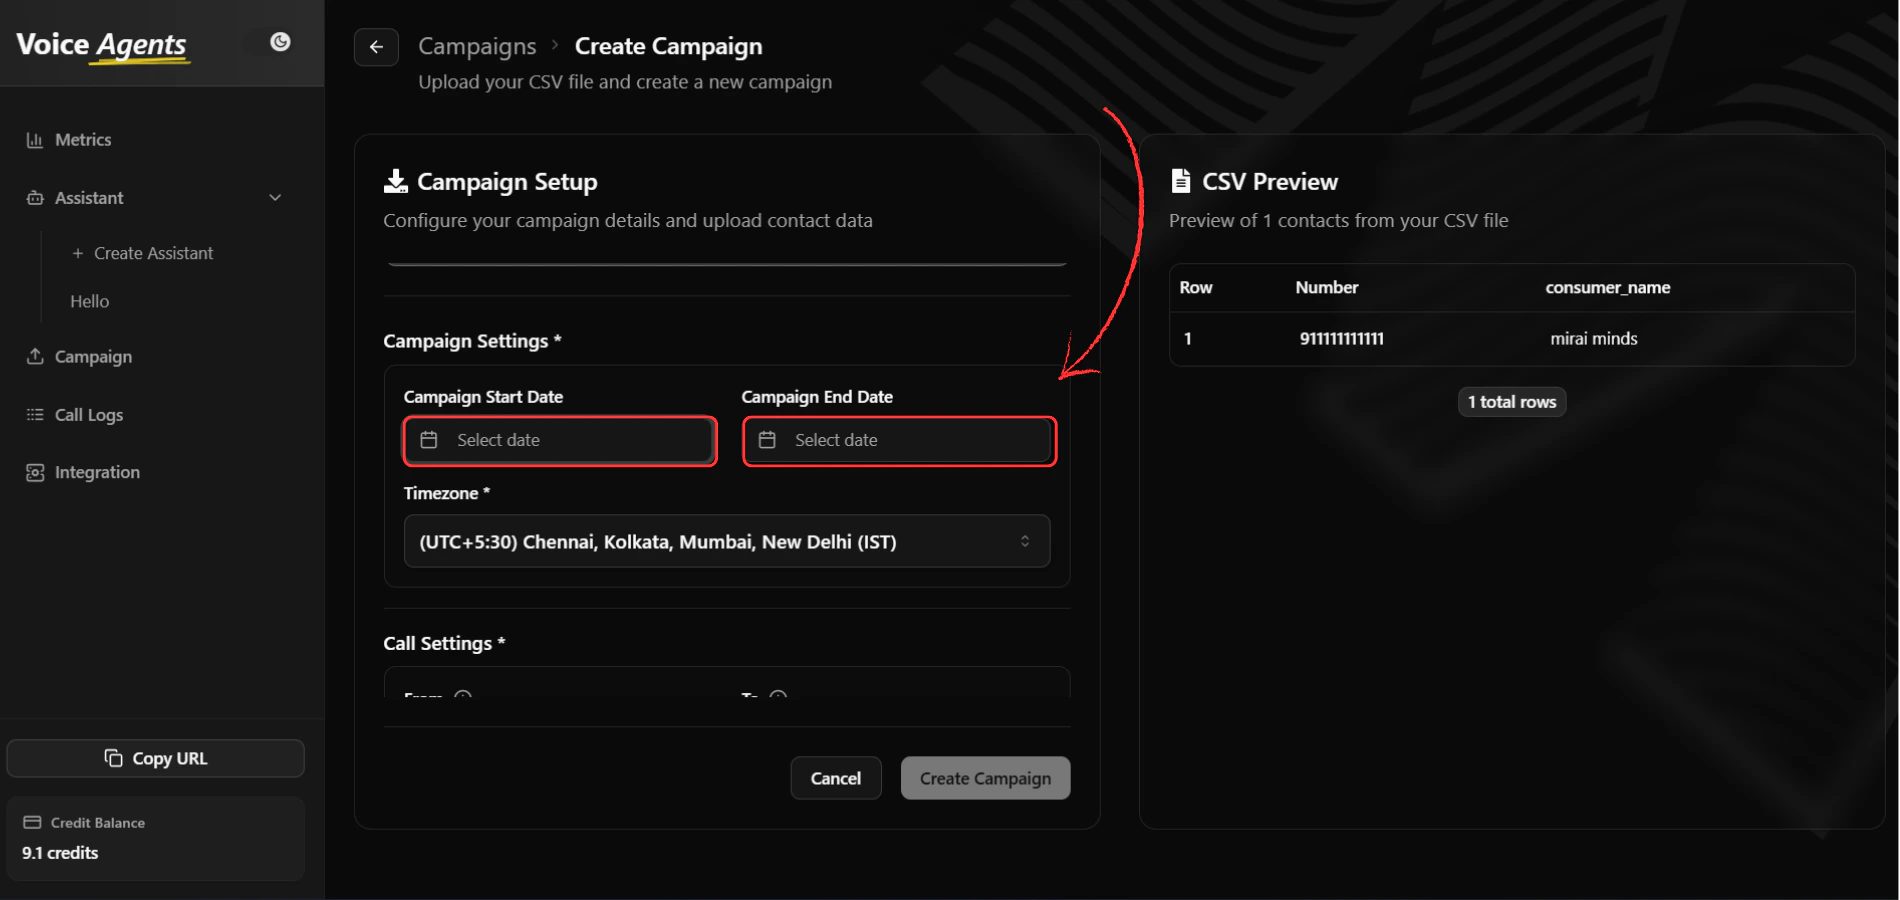
10. **Set Campaign Dates**
Configure your campaign timeline:
* **Start Date**: Select when the campaign should begin
* **End Date**: Choose when the campaign should conclude
#### Option B: API Integration
When webhook is enabled, your platform can send contact data directly through API calls, eliminating the need for manual CSV uploads.
### Step 4: Schedule Configuration
10. **Set Campaign Dates**
Configure your campaign timeline:
* **Start Date**: Select when the campaign should begin
* **End Date**: Choose when the campaign should conclude
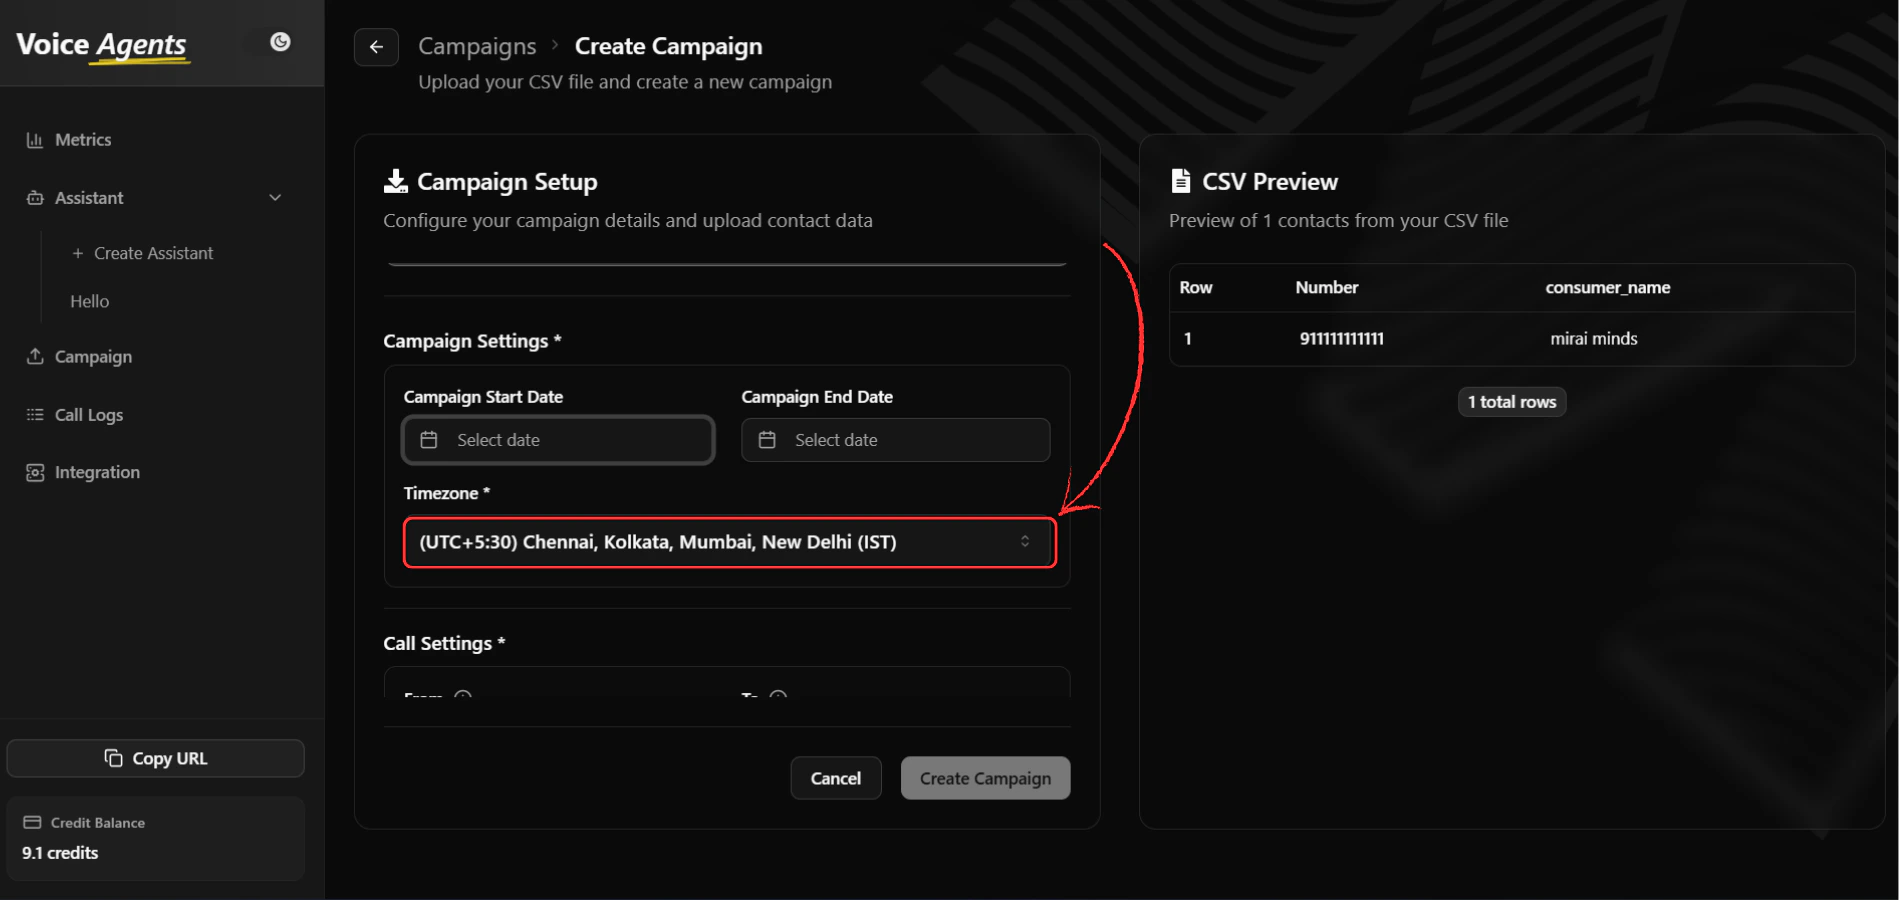
 11. **Configure Timezone**
Select the appropriate timezone for your campaign to ensure calls are made at the right local times.
11. **Configure Timezone**
Select the appropriate timezone for your campaign to ensure calls are made at the right local times.
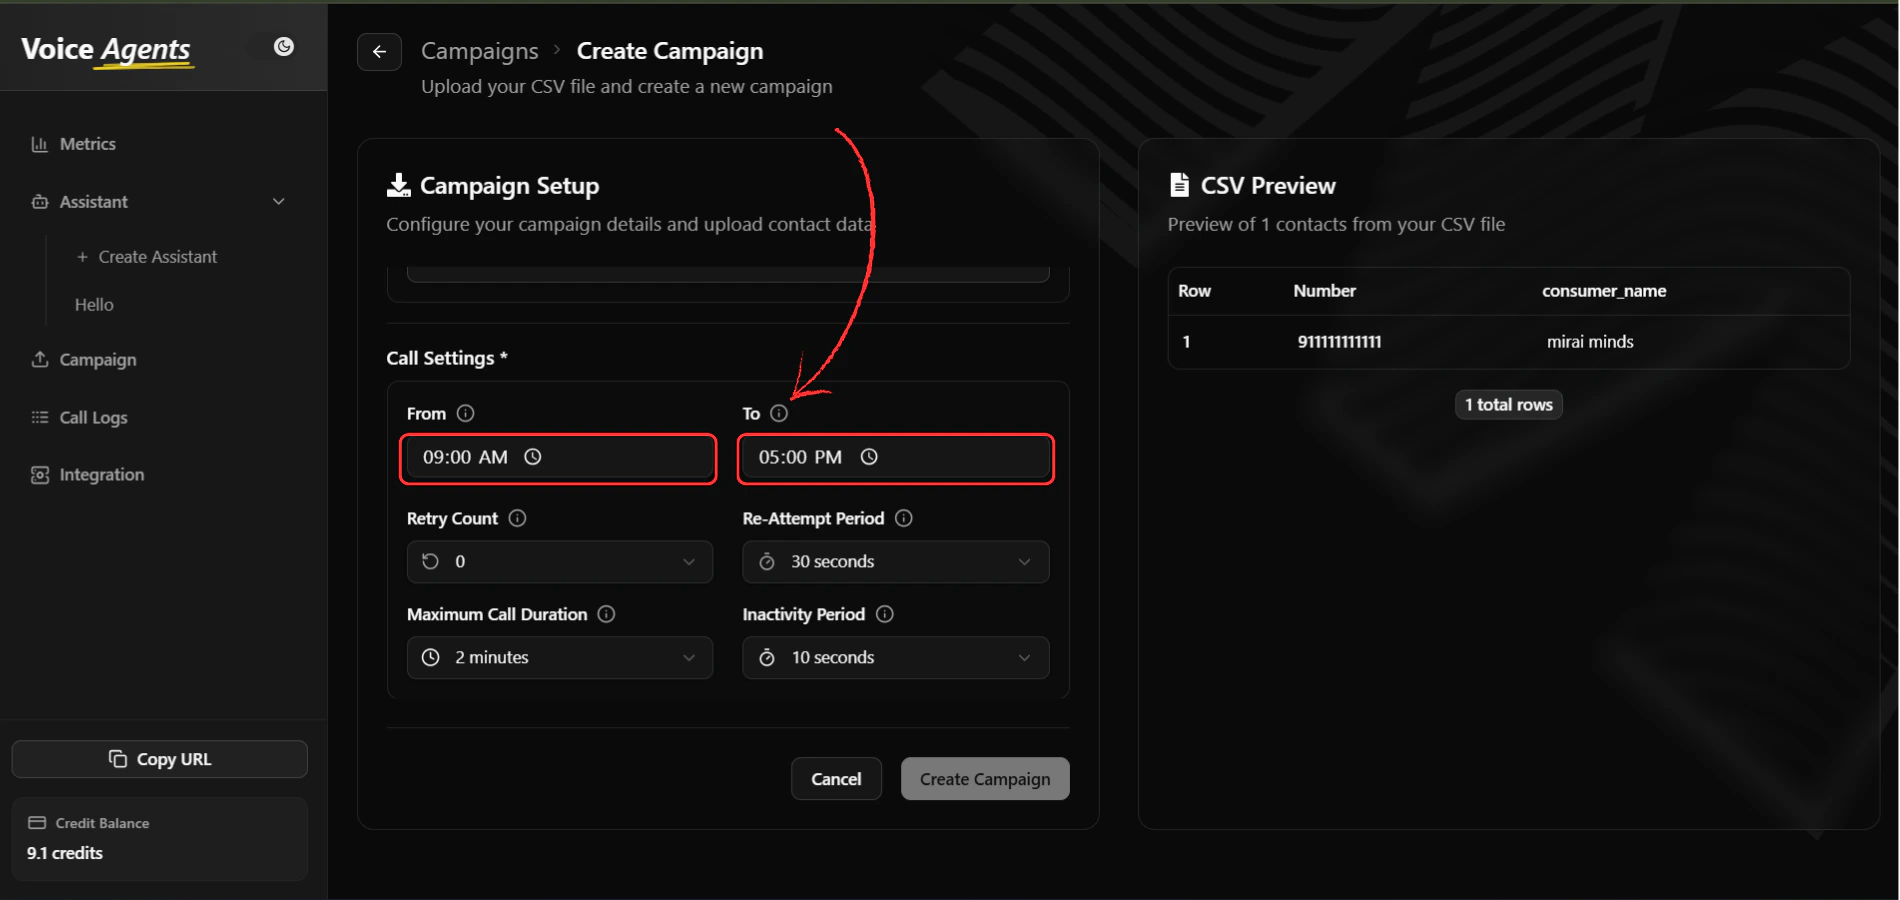
 12. **Set Operating Hours**
Define your campaign's daily calling window:
* **Start Time**: When calls can begin each day
* **End Time**: When calls should stop each day
12. **Set Operating Hours**
Define your campaign's daily calling window:
* **Start Time**: When calls can begin each day
* **End Time**: When calls should stop each day
 ### Step 5: Call Behavior Settings
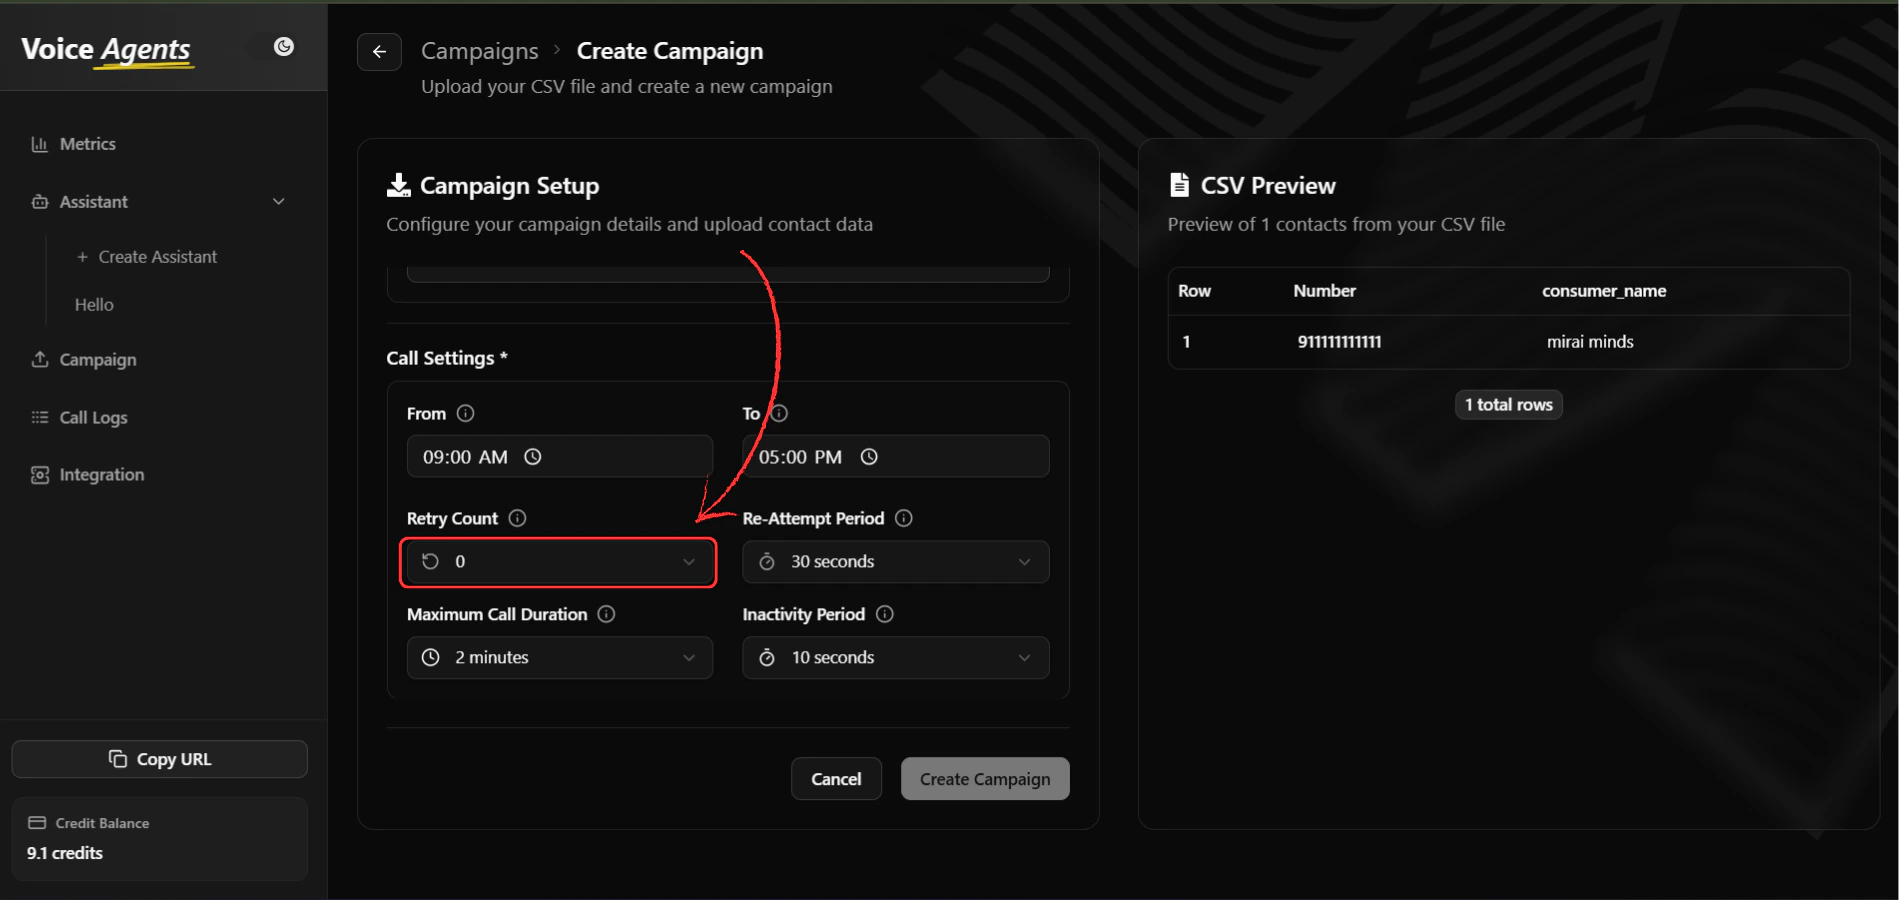
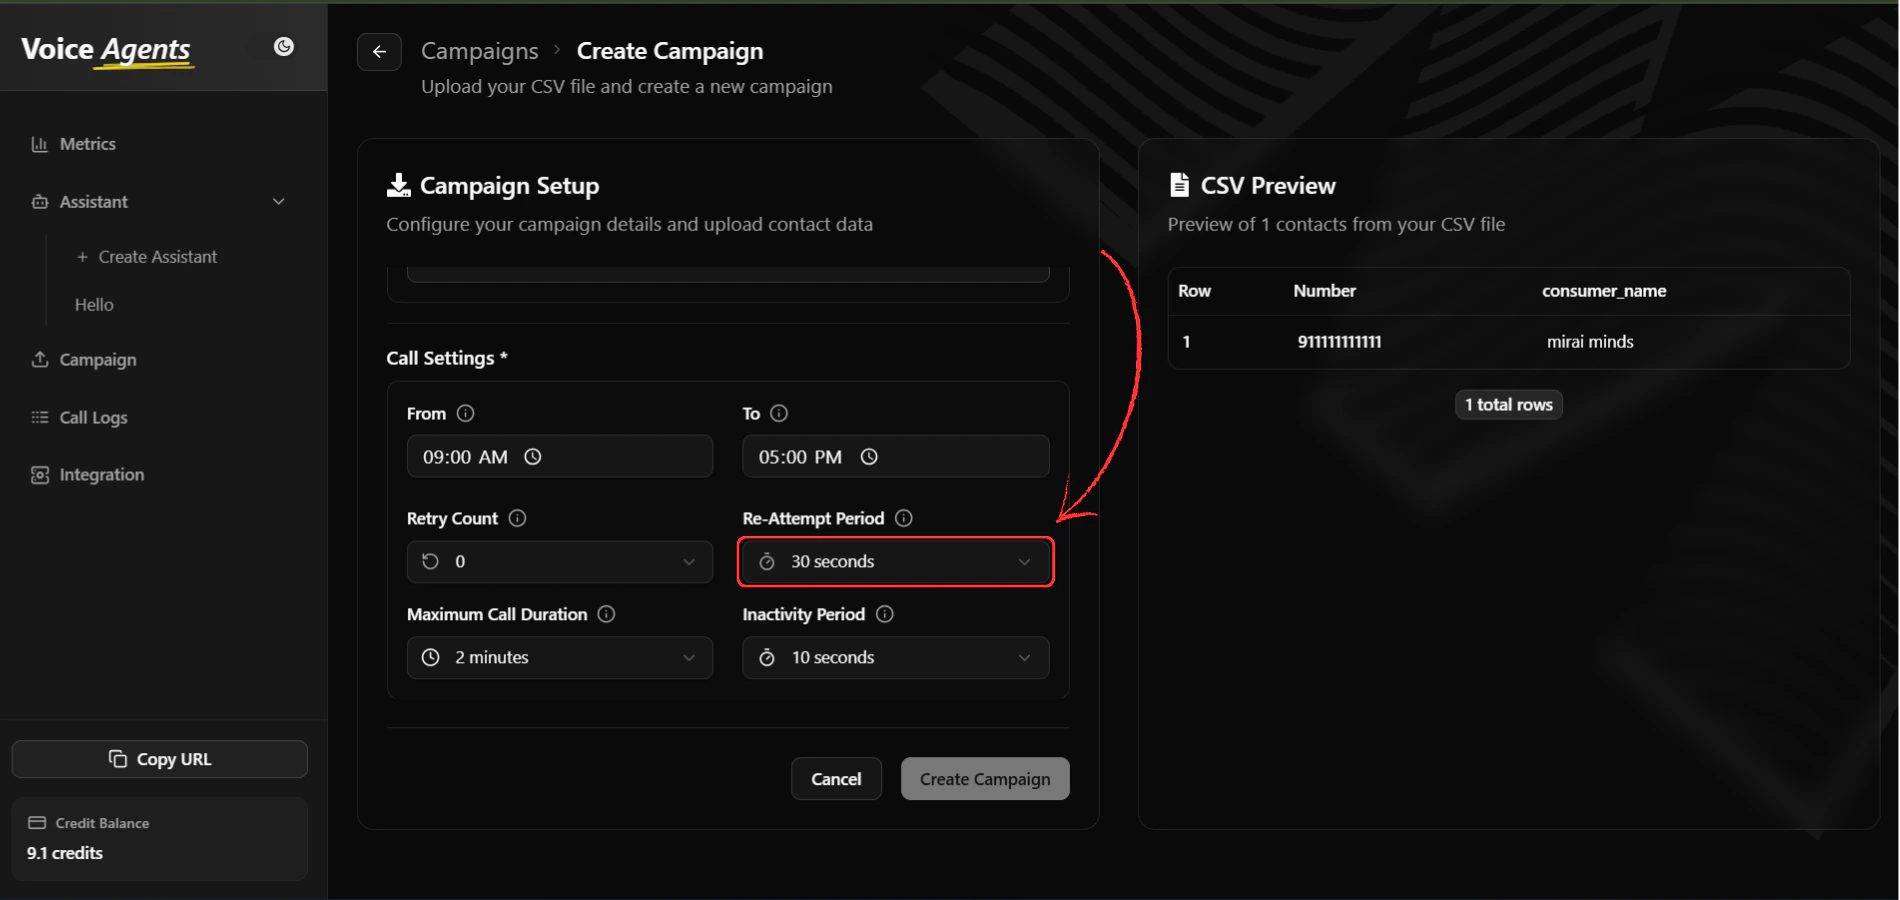
13. **Configure Retry Logic**
Set how the system handles unsuccessful call attempts:
* **Retry Count**: Number of attempts to reach each contact
* **Re-Attempt Period**: Time interval between retry attempts
### Step 5: Call Behavior Settings
13. **Configure Retry Logic**
Set how the system handles unsuccessful call attempts:
* **Retry Count**: Number of attempts to reach each contact
* **Re-Attempt Period**: Time interval between retry attempts
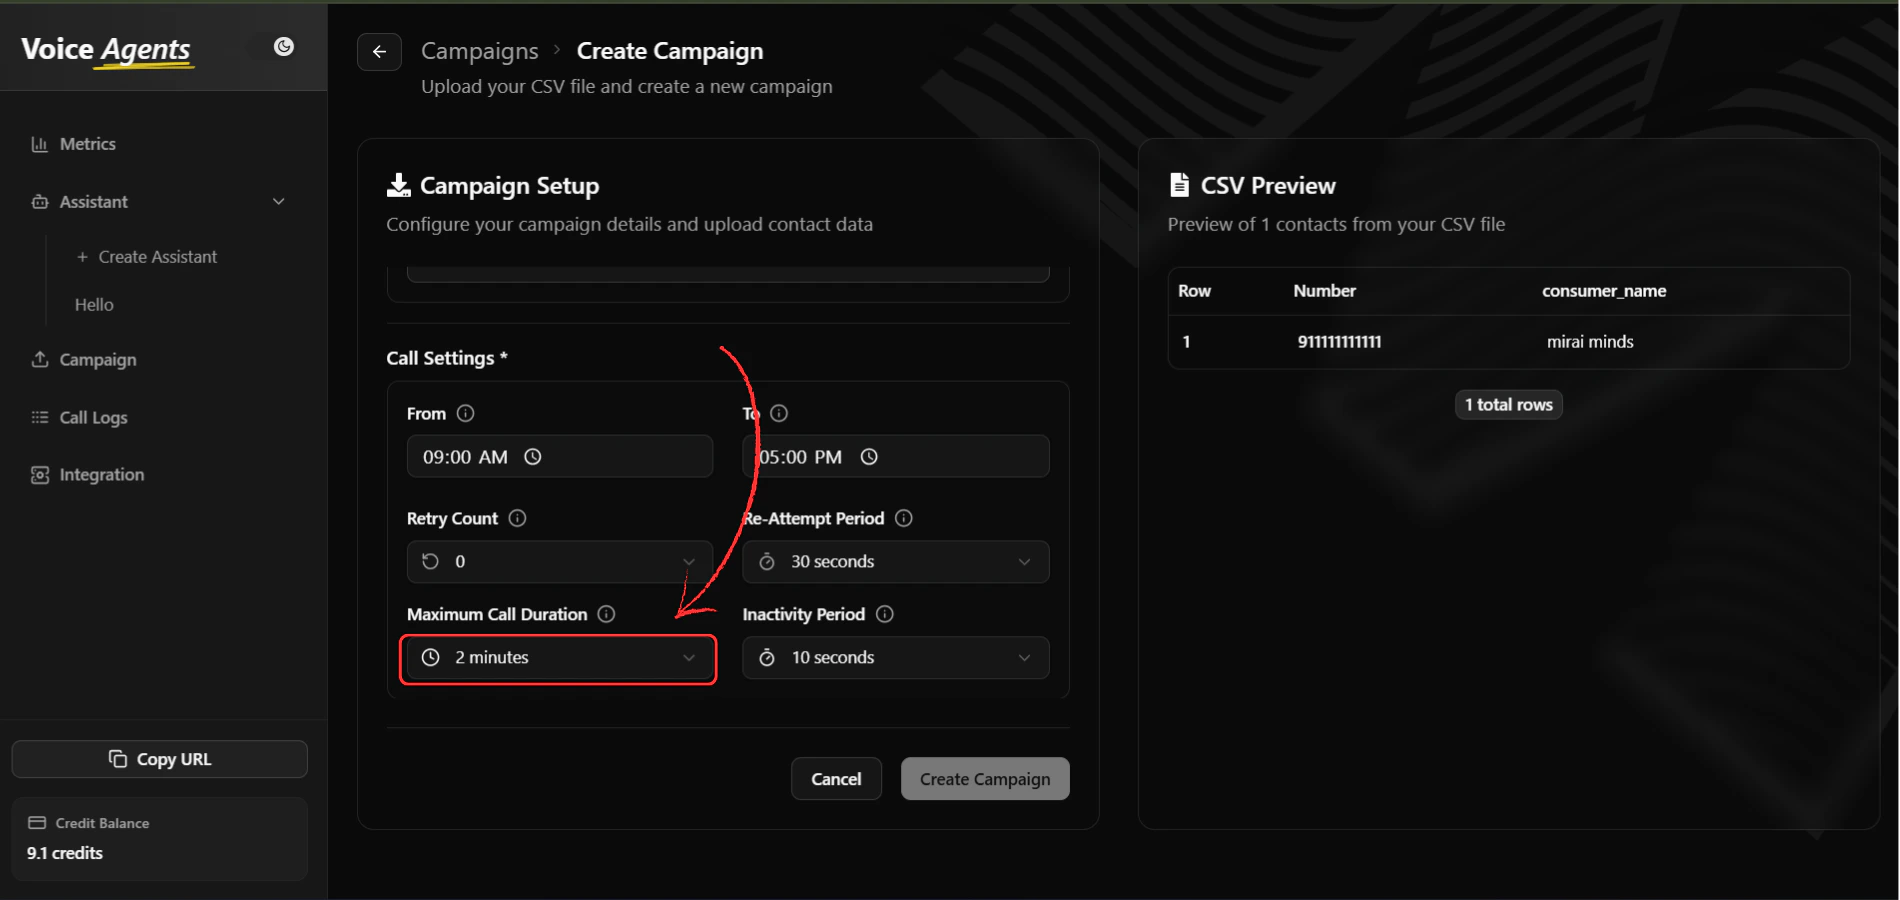
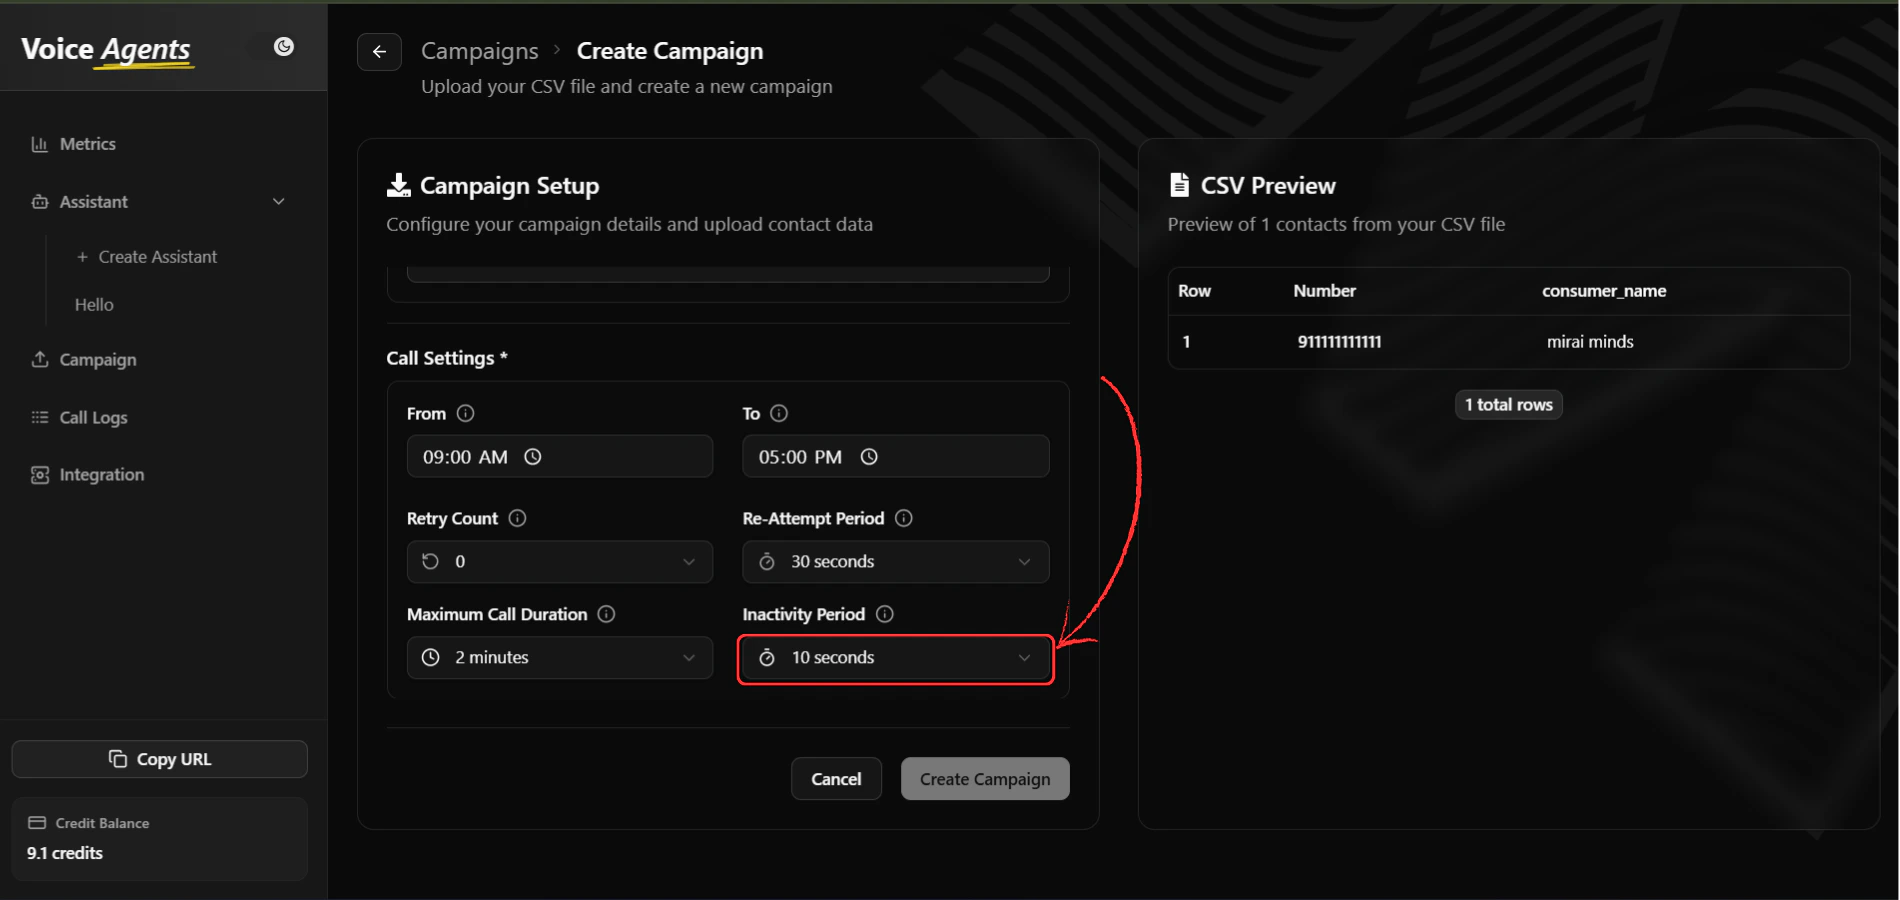
 14. **Set Call Duration Limits**
Configure call timing parameters:
* **Maximum Call Duration**: Longest allowable call time
* **Inactivity Period**: Wait time during no response before ending calls
14. **Set Call Duration Limits**
Configure call timing parameters:
* **Maximum Call Duration**: Longest allowable call time
* **Inactivity Period**: Wait time during no response before ending calls
 ### Step 6: Launch Campaign
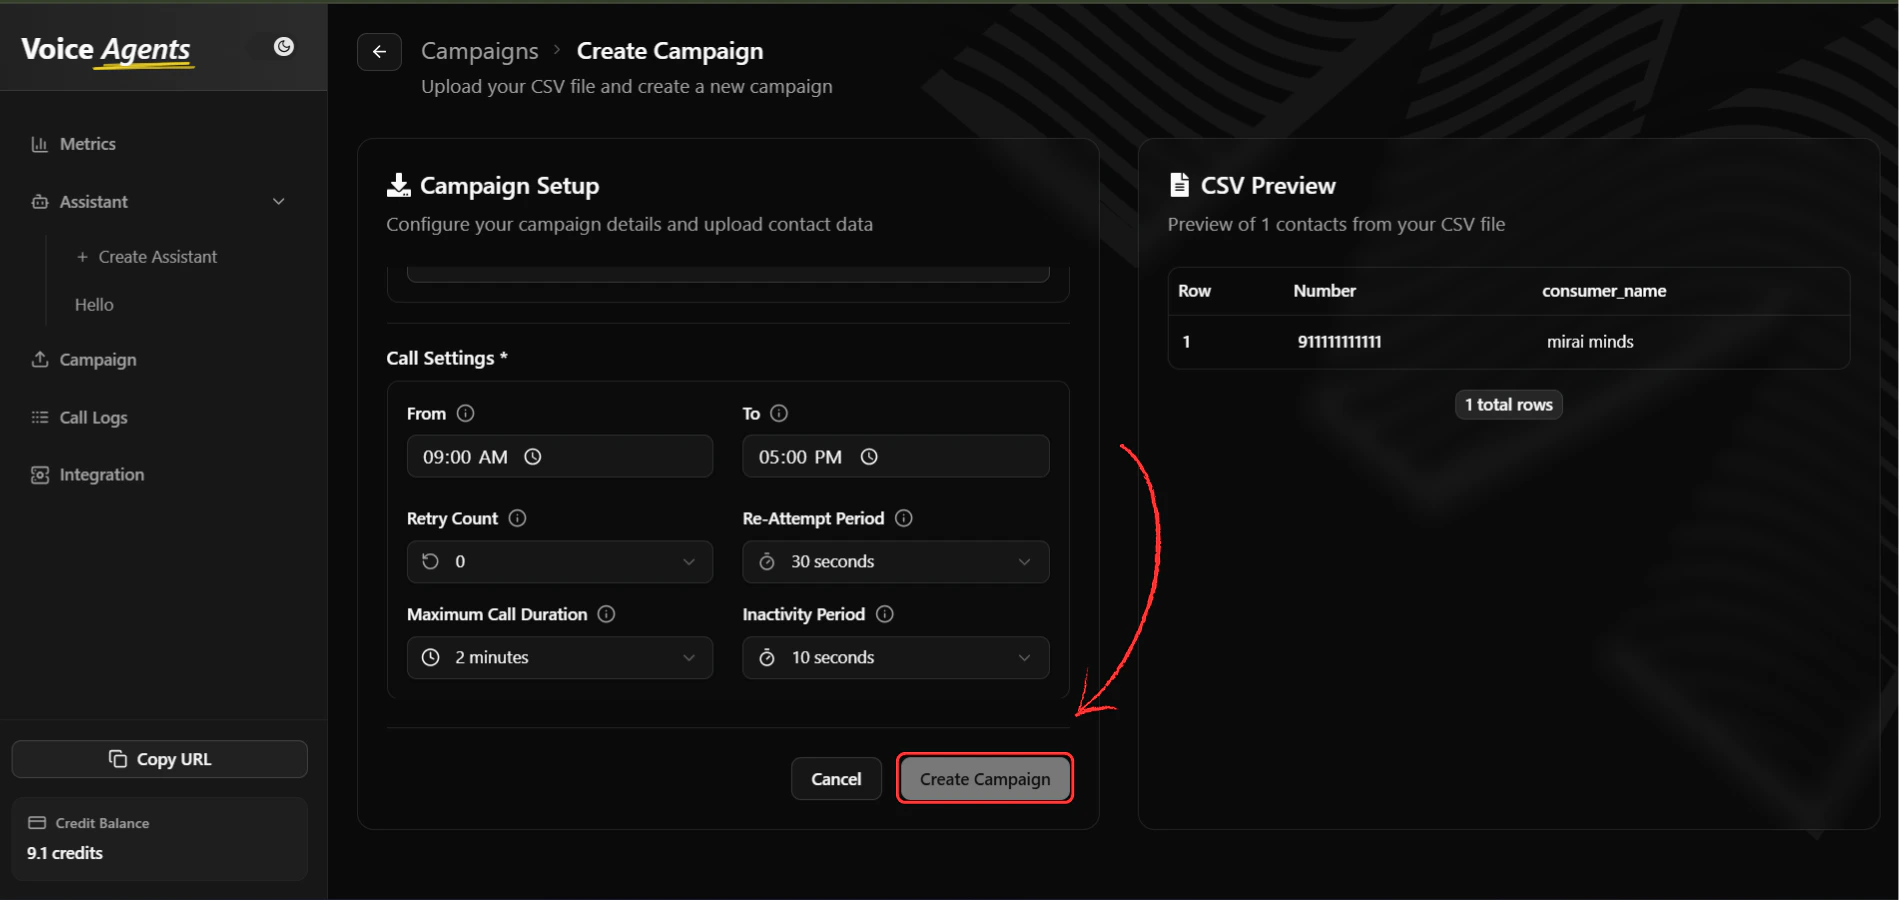
15. **Create**
Once all settings are configured, click **"Create Campaign"** to Create your campaign.
### Step 6: Launch Campaign
15. **Create**
Once all settings are configured, click **"Create Campaign"** to Create your campaign.
 16. **Handle Data Validation**
After clicking create, the system processes your data:
* **Valid Data**: Successfully stored and included in the campaign
* **Invalid/Missing Data**: Not stored but displayed in a validation modal
Any invalid or missing entries will be shown in list format, allowing you to download this data for correction and potential re-upload.
### Step 7: Launch and Manage Campaign
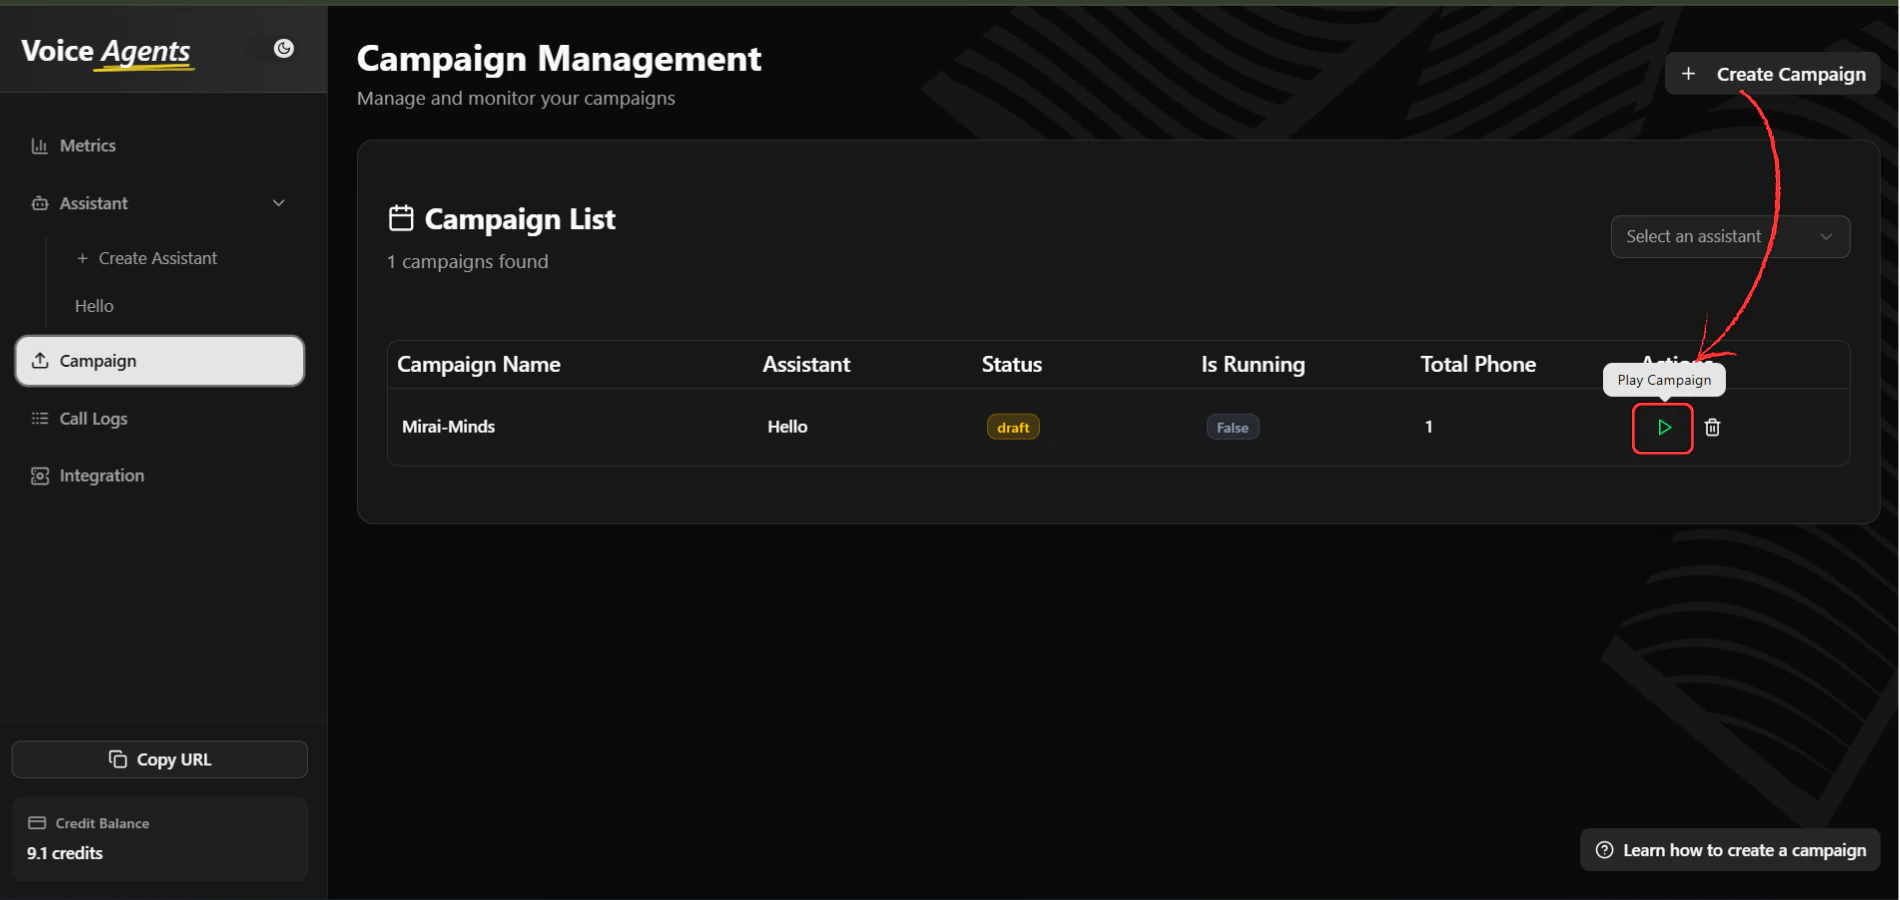
17. **Launch Your Campaign**
After creating your campaign, navigate to the campaign list to launch it. Click the **"Play"** button next to your campaign to start making calls.
16. **Handle Data Validation**
After clicking create, the system processes your data:
* **Valid Data**: Successfully stored and included in the campaign
* **Invalid/Missing Data**: Not stored but displayed in a validation modal
Any invalid or missing entries will be shown in list format, allowing you to download this data for correction and potential re-upload.
### Step 7: Launch and Manage Campaign
17. **Launch Your Campaign**
After creating your campaign, navigate to the campaign list to launch it. Click the **"Play"** button next to your campaign to start making calls.
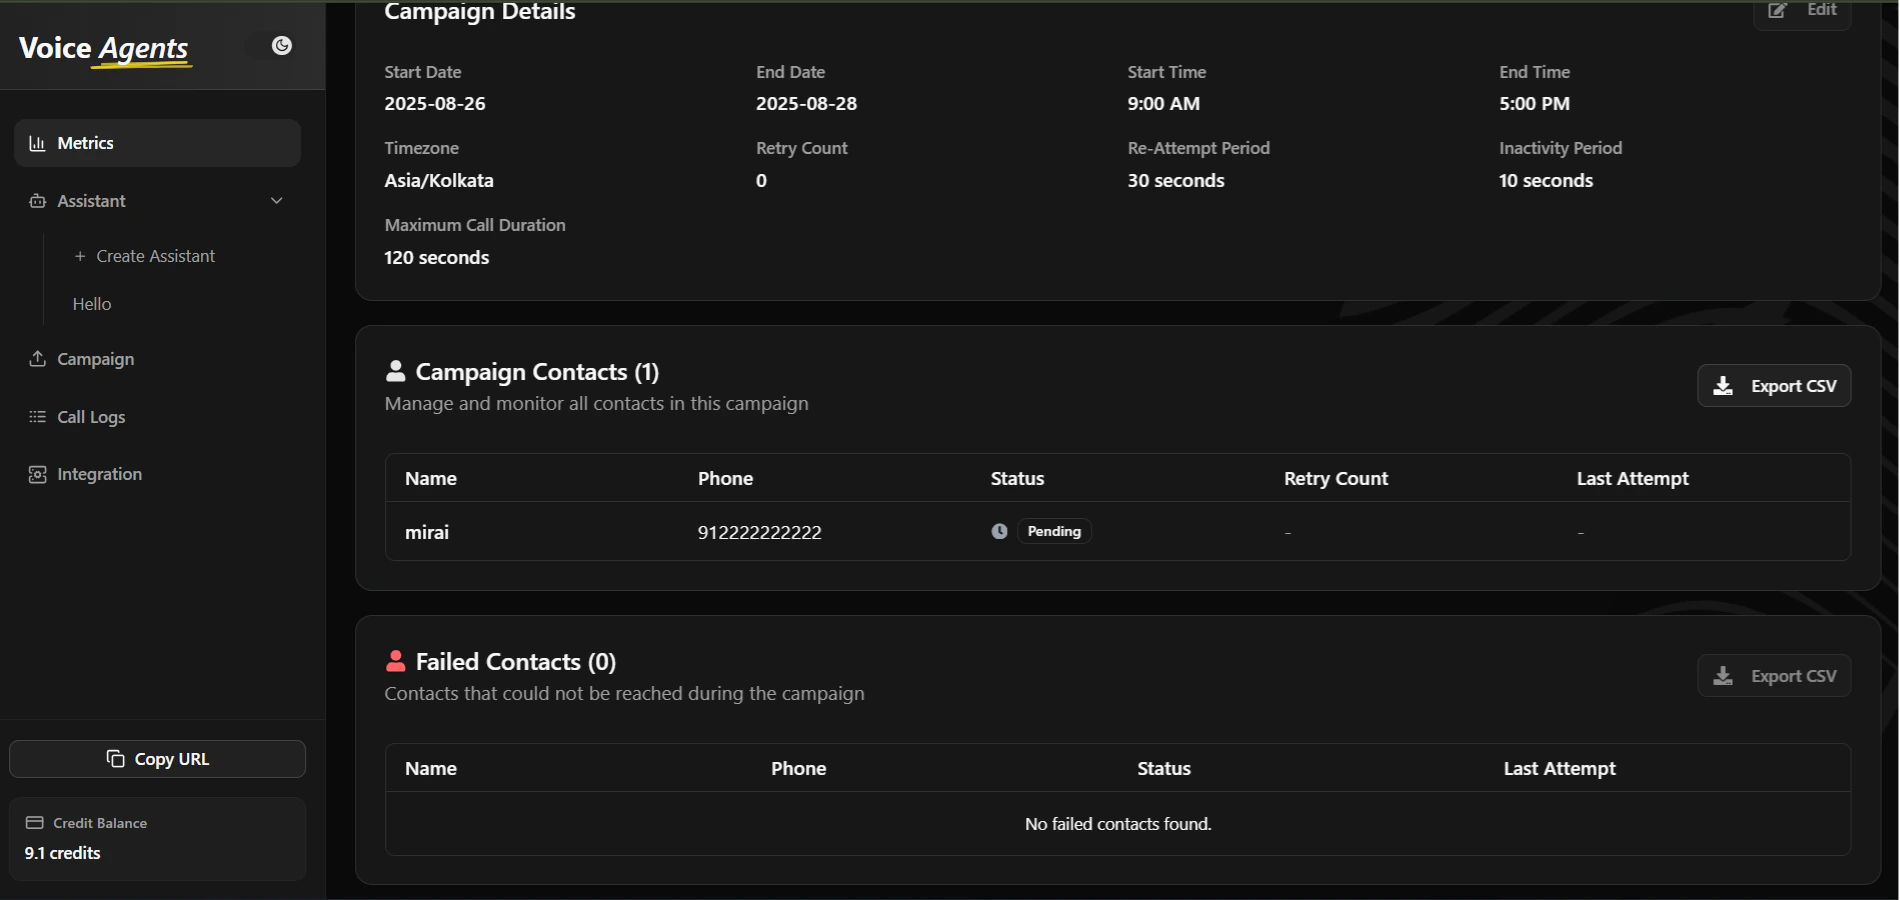
 18. **Track Campaign Status**
Monitor your campaign's progress by visiting the **Campaign Status** page. Here you can view:
* Call completion rates
* Success/failure statistics
* Real-time campaign progress
* Contact attempt history
18. **Track Campaign Status**
Monitor your campaign's progress by visiting the **Campaign Status** page. Here you can view:
* Call completion rates
* Success/failure statistics
* Real-time campaign progress
* Contact attempt history
 19. **Copy Webhook API Endpoint**
If you enabled webhook integration, you can copy the API endpoint for your platform integration. Click **"Copy Webhook"** to get the endpoint URL for sending data via API.
19. **Copy Webhook API Endpoint**
If you enabled webhook integration, you can copy the API endpoint for your platform integration. Click **"Copy Webhook"** to get the endpoint URL for sending data via API.
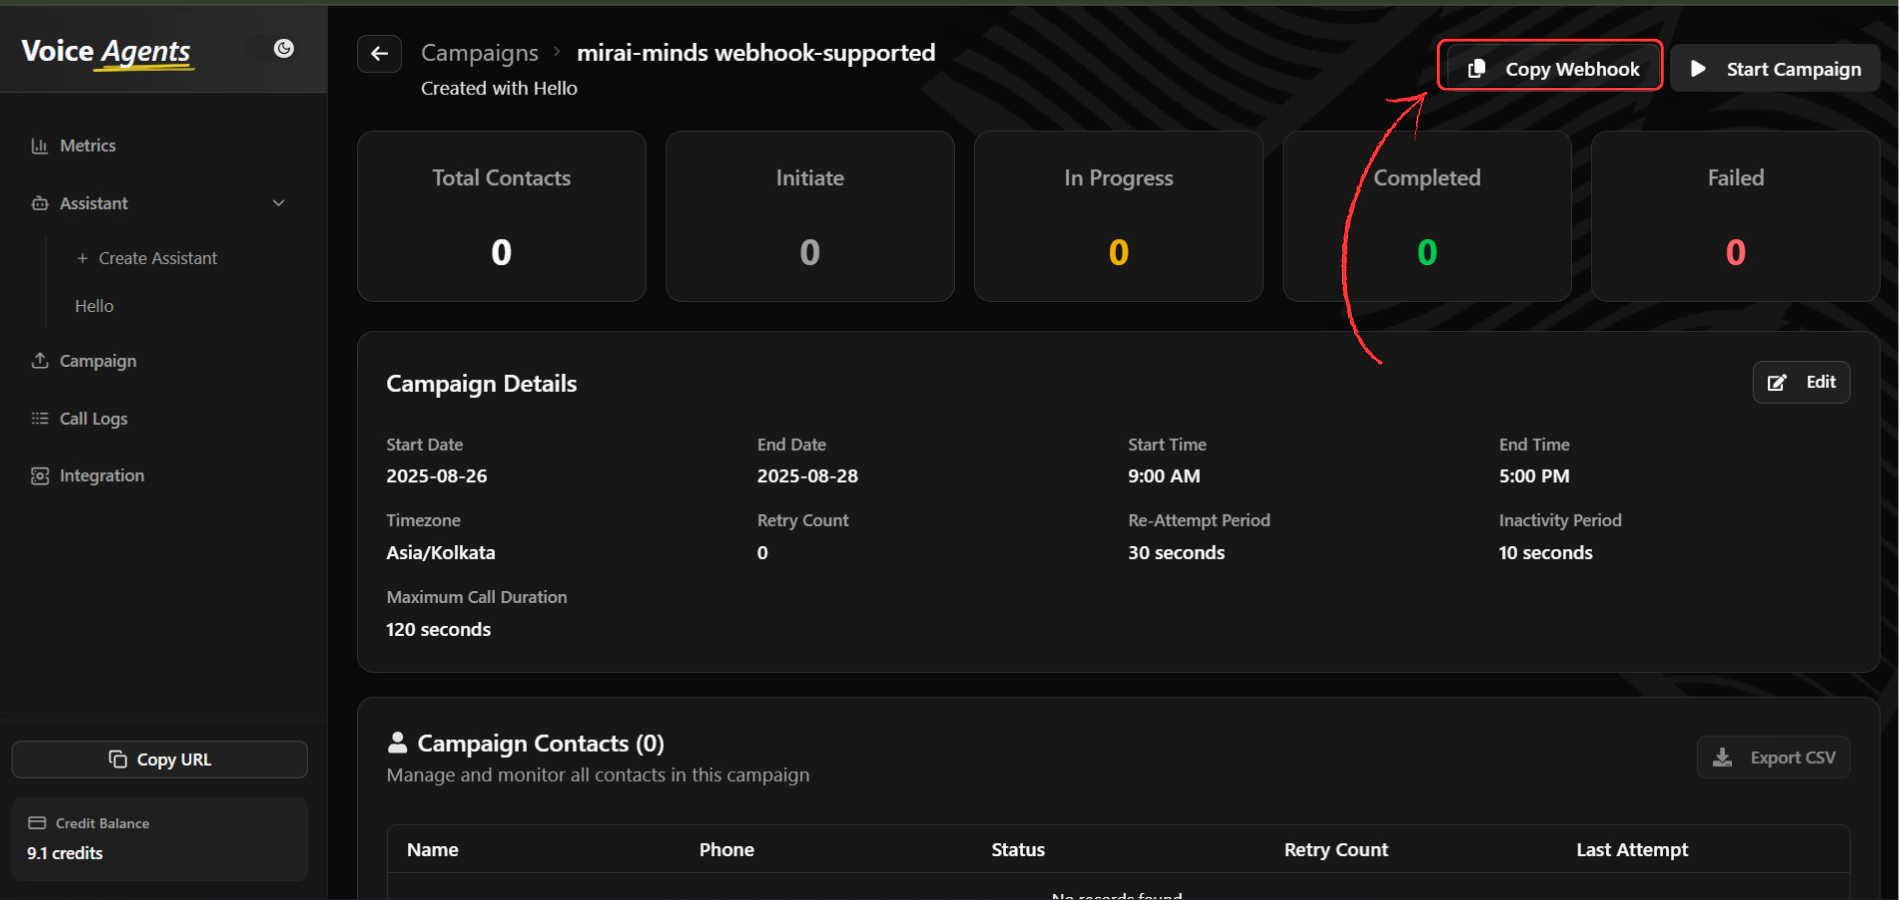 Use this endpoint to programmatically add contacts to your campaign or trigger campaign events from your existing systems.
## What's Next?
Once your campaign is created and launched, you can:
* **Monitor Performance** - Track call success rates and campaign progress
* **Manage Active Campaigns** - Pause, resume, or modify running campaigns
* **Analyze Results** - Review detailed campaign analytics and outcomes
* **Export Reports** - Download campaign performance data
## Best Practices
### Data Preparation
* Test your CSV data with a small sample before uploading large datasets
* Ensure phone numbers are properly formatted for your target regions
* Include all required fields to minimize data validation issues
### Campaign Optimization
* Set reasonable retry limits to avoid overwhelming contacts
* Configure appropriate operating hours to respect contact preferences
* Monitor initial performance and adjust settings as needed
### Compliance Considerations
* Ensure you have proper consent to contact all numbers in your campaign
* Respect do-not-call lists and opt-out requests
* Follow local regulations for automated calling
Use this endpoint to programmatically add contacts to your campaign or trigger campaign events from your existing systems.
## What's Next?
Once your campaign is created and launched, you can:
* **Monitor Performance** - Track call success rates and campaign progress
* **Manage Active Campaigns** - Pause, resume, or modify running campaigns
* **Analyze Results** - Review detailed campaign analytics and outcomes
* **Export Reports** - Download campaign performance data
## Best Practices
### Data Preparation
* Test your CSV data with a small sample before uploading large datasets
* Ensure phone numbers are properly formatted for your target regions
* Include all required fields to minimize data validation issues
### Campaign Optimization
* Set reasonable retry limits to avoid overwhelming contacts
* Configure appropriate operating hours to respect contact preferences
* Monitor initial performance and adjust settings as needed
### Compliance Considerations
* Ensure you have proper consent to contact all numbers in your campaign
* Respect do-not-call lists and opt-out requests
* Follow local regulations for automated calling